
Garden Advice
How to Build a Raised Bed for Your Garden 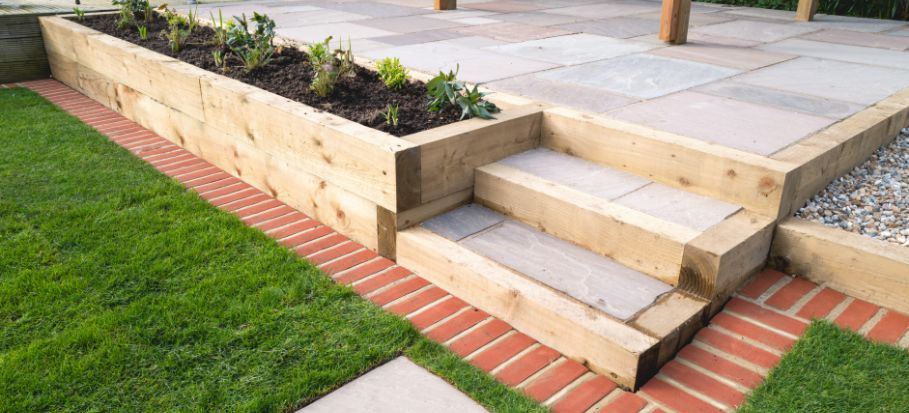
A raised patio can be the secret trick up your sleeve for any green space that is not completely flat. With a small or a large garden, there are many raised patio designs that can help structure the area. Whether you have already decided on the when and where of building a raised patio or are still considering your options, this article is for you.
So, if you are someone who:
Or have any other similar idea in mind, then read on.
Building a raised patio can be an easy task when you know the main steps of the process. Before you commit to anything, it is very important to think about the main reason for and use of the patio. Then you can decide how big it should be and where to locate it. Once that is done, you can proceed with the below steps:
Step 1. Clear the area
Before you do anything, you will have to remove any debris, larger rocks, vegetation and clutter.
Step 2. Mark the area
Use stakes or anything else available to mark your area. If you are planning on a curved patio, a good idea would be to use a garden hose or a thicker rope to mark the line of the shape you envision. Once this is done, you will have a clear idea on how the space will look and its size. And when you know the size, you can also properly estimate the budget for the job.
Step 3. Plan the height
Most patios are usually adjacent to the house. If this is your case, make sure the house floor and your patio floor are on the same level to achieve continuity going in or out. But of course, the patio can also connect to the home with steps, or be anywhere else in the garden, unrelated to the house floor level.
Step 4. Dig a trench
Your patio will need a retaining wall, so you must prepare properly for it. Dig a trench with square corners and enough depth to support the wall. Then level and compact the bottom, using a piece of wood.
Step 5. Ensure your patio is waterproof
To make it damp-proof, cover the trench and the patio base with a landscaping fabric. Then, place on top some rocks and sand (concrete will work, too) to create a leveled horizontal surface.
Step 6. Retaining wall
The wall that surrounds and holds the raised patio in place should be strong and stable. That is why the first course of bricks is vital to the integrity of the entire wall. Once that is properly done, continue up to the desired height. Finally, you can seal the bricks.
Step 7.Pave your patio
Start installing the patio pavers from the retaining wall inwards. If you have used sand for the base, make sure to not disrupt it too much.
Step 8. Pointing the pavers
Finalise your project by filling the gaps between the pavers with sand. Spread out some fine-grained sand and sweep it to fill the areas between the pavers.
These are the main steps to building a raised patio. But there are several patio varieties you can go for, depending on your area and personal choice.
Depending on which option is the best for you, different materials may be required. Either way, make sure to plan for a few days’ work in dry weather.
A raised patio on a slope is a great idea to create several levels in your garden and maximise the space you have available. Think carefully about the sections you would like to establish and the size of each one. When planning for a patio on a slope it is best not to extend it past 15 feet. When it is more than that, the structure is often too difficult to hold, and it may only last a few years.
When you have a sloped garden, you will need to spend a bit more on the preparation part. After sectioning the desired area with stakes, it is time to level the area. Depending on which end of the slope the patio will be, you will have to either add soil or remove some.
Apart from professional equipment, you can also use a makeshift level by tying a string between two stakes and keeping the soil level just under it. After that, proceed with the main steps, we’ve described above.
A concrete patio is the next best thing if you are looking for something different than patio pavers. Follow the initial steps up to step 6. Then it is time to establish a solid base, so the concrete does not crack:
Once that is done and your concrete is mixed it is time to get creative. If you want a simple concrete patio, proceed with the instructions on your concrete mixture. But if you are looking to change things up, there are some interesting options you may want to consider:
Once you have chosen your concrete design, make sure to follow the instructions on your concrete mixture until it fully sets.
Apart from pavers and concrete, another suitable option for your patio is using bricks. Follow the main instructions up to step 7. Once you are done with the base, it is time to lay the bricks. Carefully consider how many you will need and the pattern you will lay them in.
Make sure to start arranging the bricks from the retainer wall inwards. Once the bricks are laid, you can brush out fine-grained sand over them to fill the gaps between. This will keep grass and weeds from growing in between and keep your patio easy to maintain.
If this sounds easy on paper but challenging in practice, then it may be best to consider hiring a specialist. We will be happy to assist you with the entire project! Fantastic Services offers professional paving services, designed to enhance your green space in a unique and creative way.
Share your vision and leave all the hard work to the professionals. This will save you the time of doing the work yourself, as well as shopping time for materials and hiring any specialists’ tools and equipment. Get one step closer to your dream garden space and arrange your service now.
Get in touch with us and request your gardening professional today.

Did you find our post helpful? How do you plan on styling your new raised patio? Share with us in the comments below!
Image source: Shutterstock / Christine Bird


The only home improvement newsletter you will ever need!
We will never spam you. Pinky promise!
For more information, check out our privacy policy.


